While I do most of my designing in Silhouette Studio. Every once and a while I like to use Adobe Illustrator. Silhouette America has this fantastic little plugin you can purchase for around $30 called Silhouette Connect. This little plugin works with both Adobe Illustrator and Corel Draw.
This plugin allows you to send a design to your machine to cut directly from Illustrator (or Corel), without having to open your Silhouette Studio software. Since I use Illustrator, and not Corel Draw, this post will focus on using that. Although, it should be almost exactly the same when using Corel.
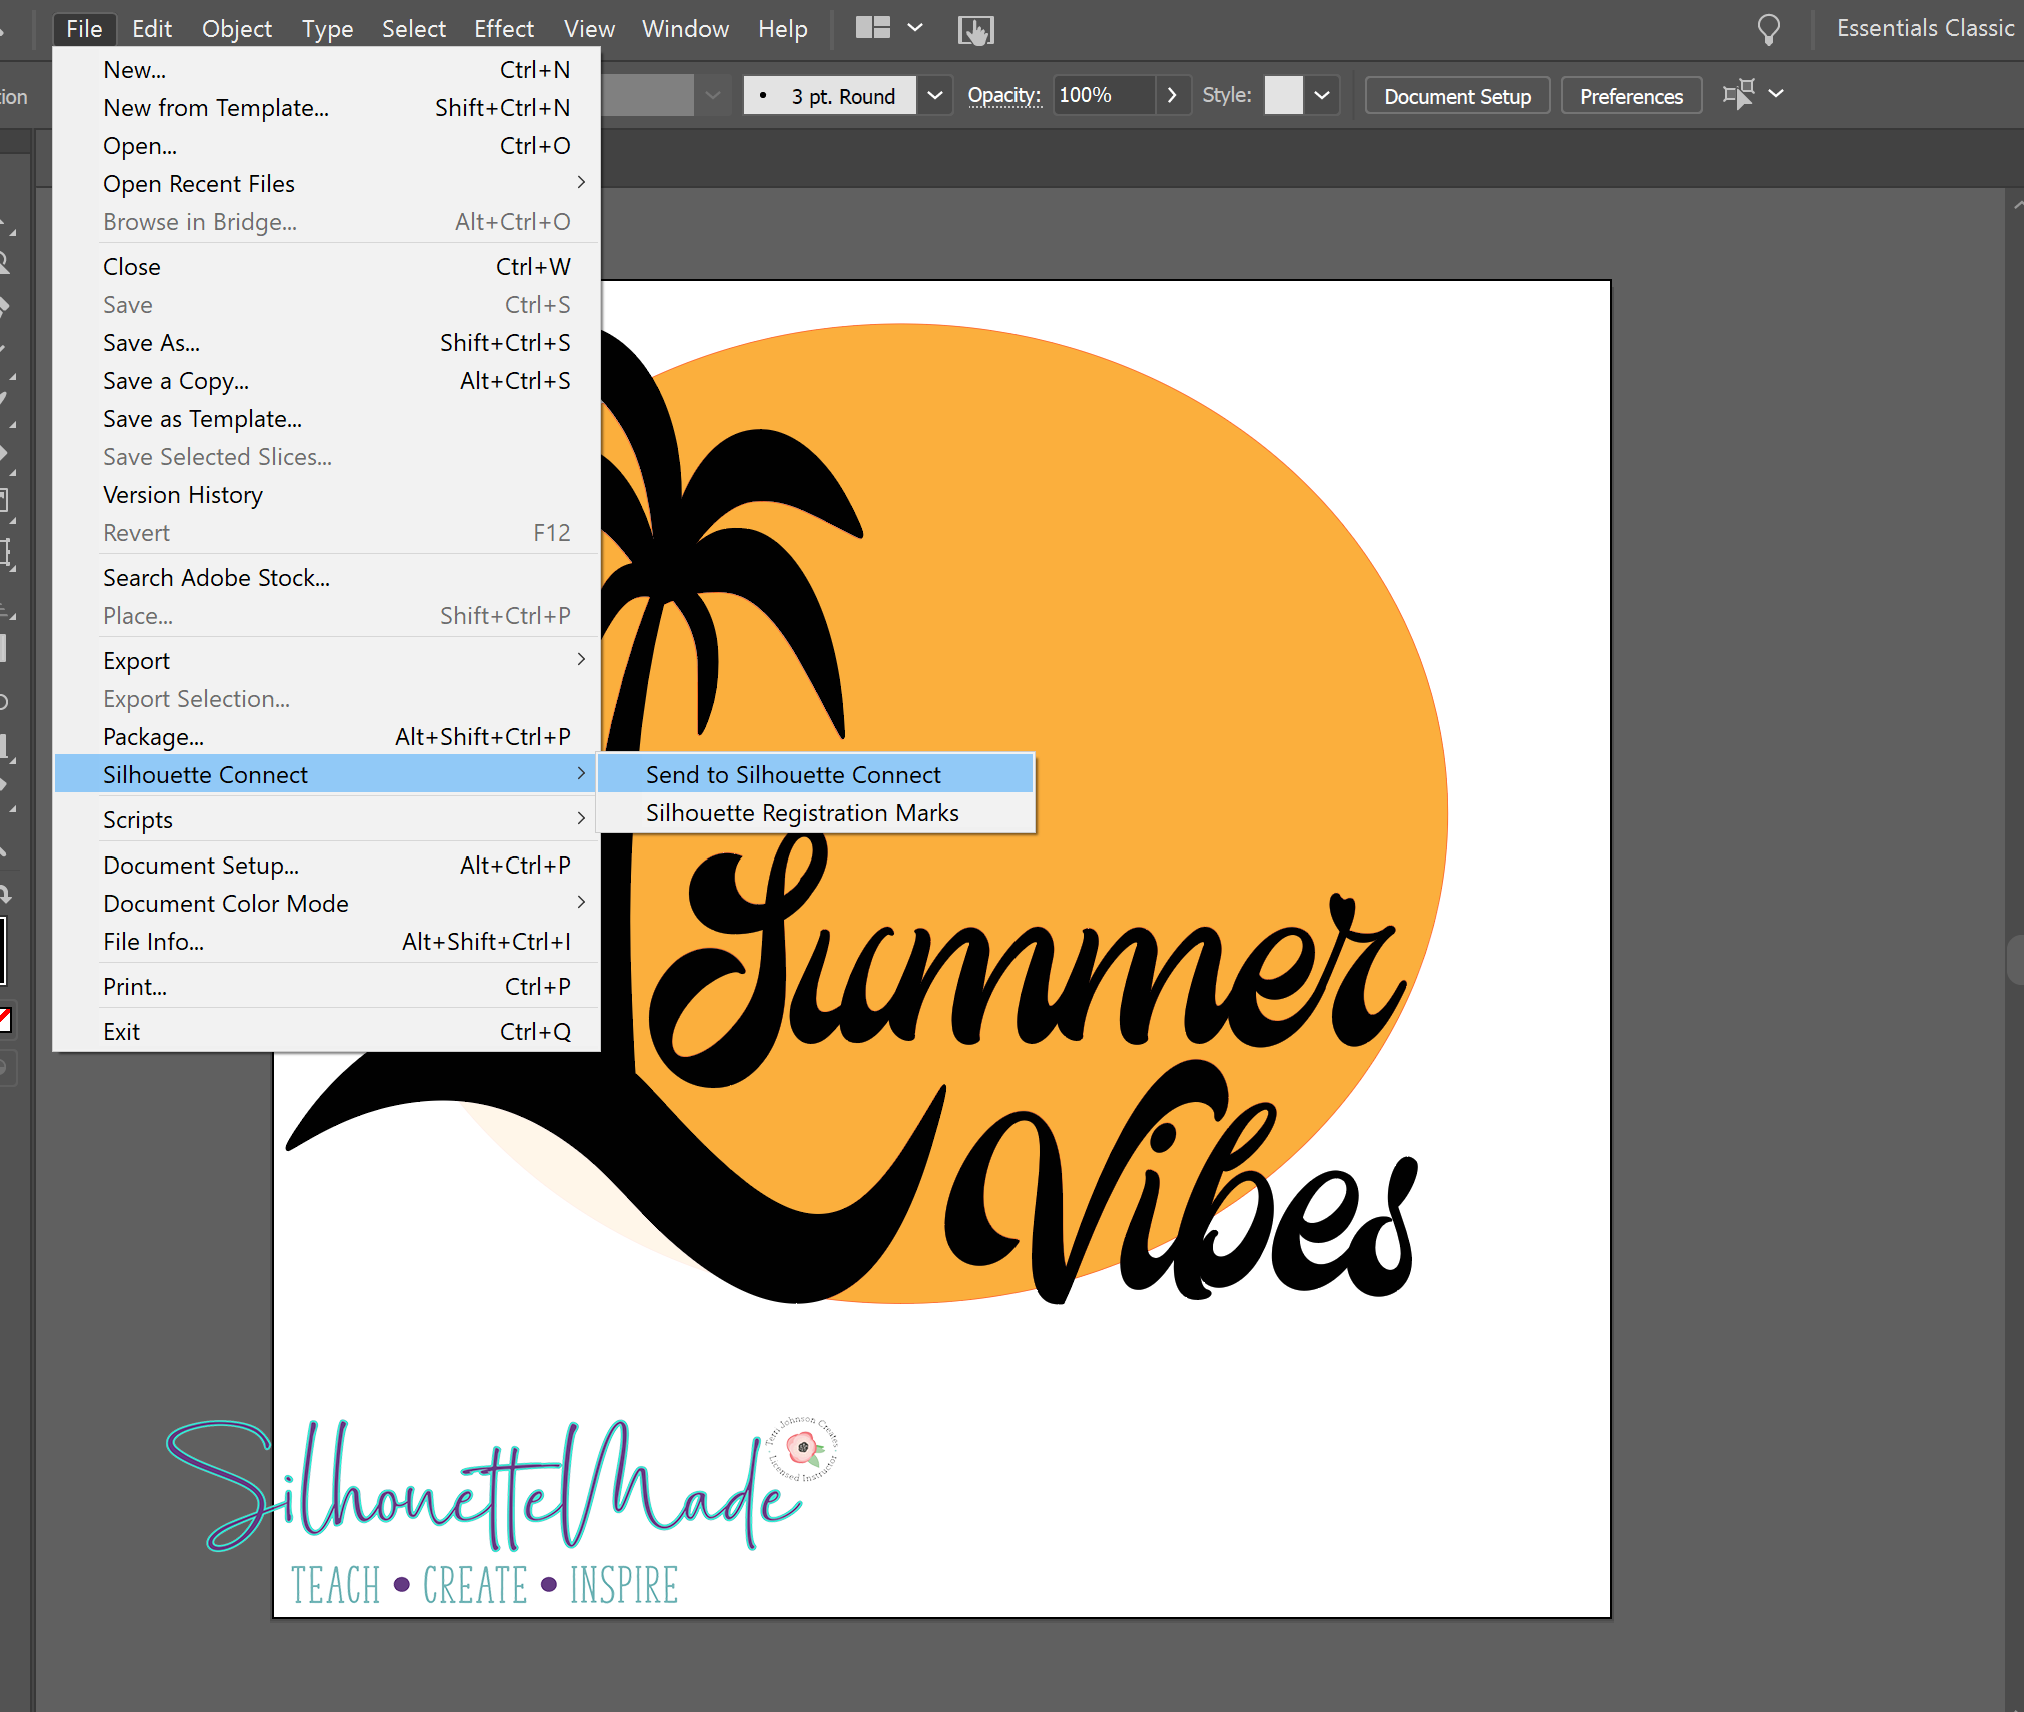
Once you install the plugin, to access it you will go to File>Silhouette Connect. There are two options:
- Send to Silhouette Connect
- Silhouette Registration Marks
Let’s look at the Silhouette Registration Marks panel first. You would use this if you were going to do a Print and Cut with your file. When doing a print and cut through Silhouette Connect you will want to set up your file in Illustrator using layers, at least one layer for your design and a separate layer for your cut lines around the outside of the design. This will make it easier for you when you go to cut.
This panel adds the registration marks that your machine would use to accurately determine where to cut. It works just like the registration marks in Silhouette Studio.
- Style: Unless you are using a machine that was sold BEFORE a Cameo 1, you would leave the style of registration mark as Type 1. There are not many people around using a machine that was out before a Cameo, so most likely you will not change that field.
- Units: This is where you set your unit of measurement.
- Length: This changes how long your registration marks are. By default it is set on the longest setting. You can make them smaller, but I find that you get better, more consistent results if you do not change this setting.
- Thickness: This changes the width of the registration mark lines. You can change the thickness (or stroke) of the line, but again, I find you get better, more consistent results if you do not change this setting.
- Margin: This is the distance the registration marks are either from the design or the edge of the page.
- Relative to cut job: This is to set the margin based on the position of the cut job.
- Relative to media: This is to set the margin based on the media size.
- Align document origin with registration marks: This will set the registration marks position on the document origin. This is only used if you change the document origin in Illustrator.
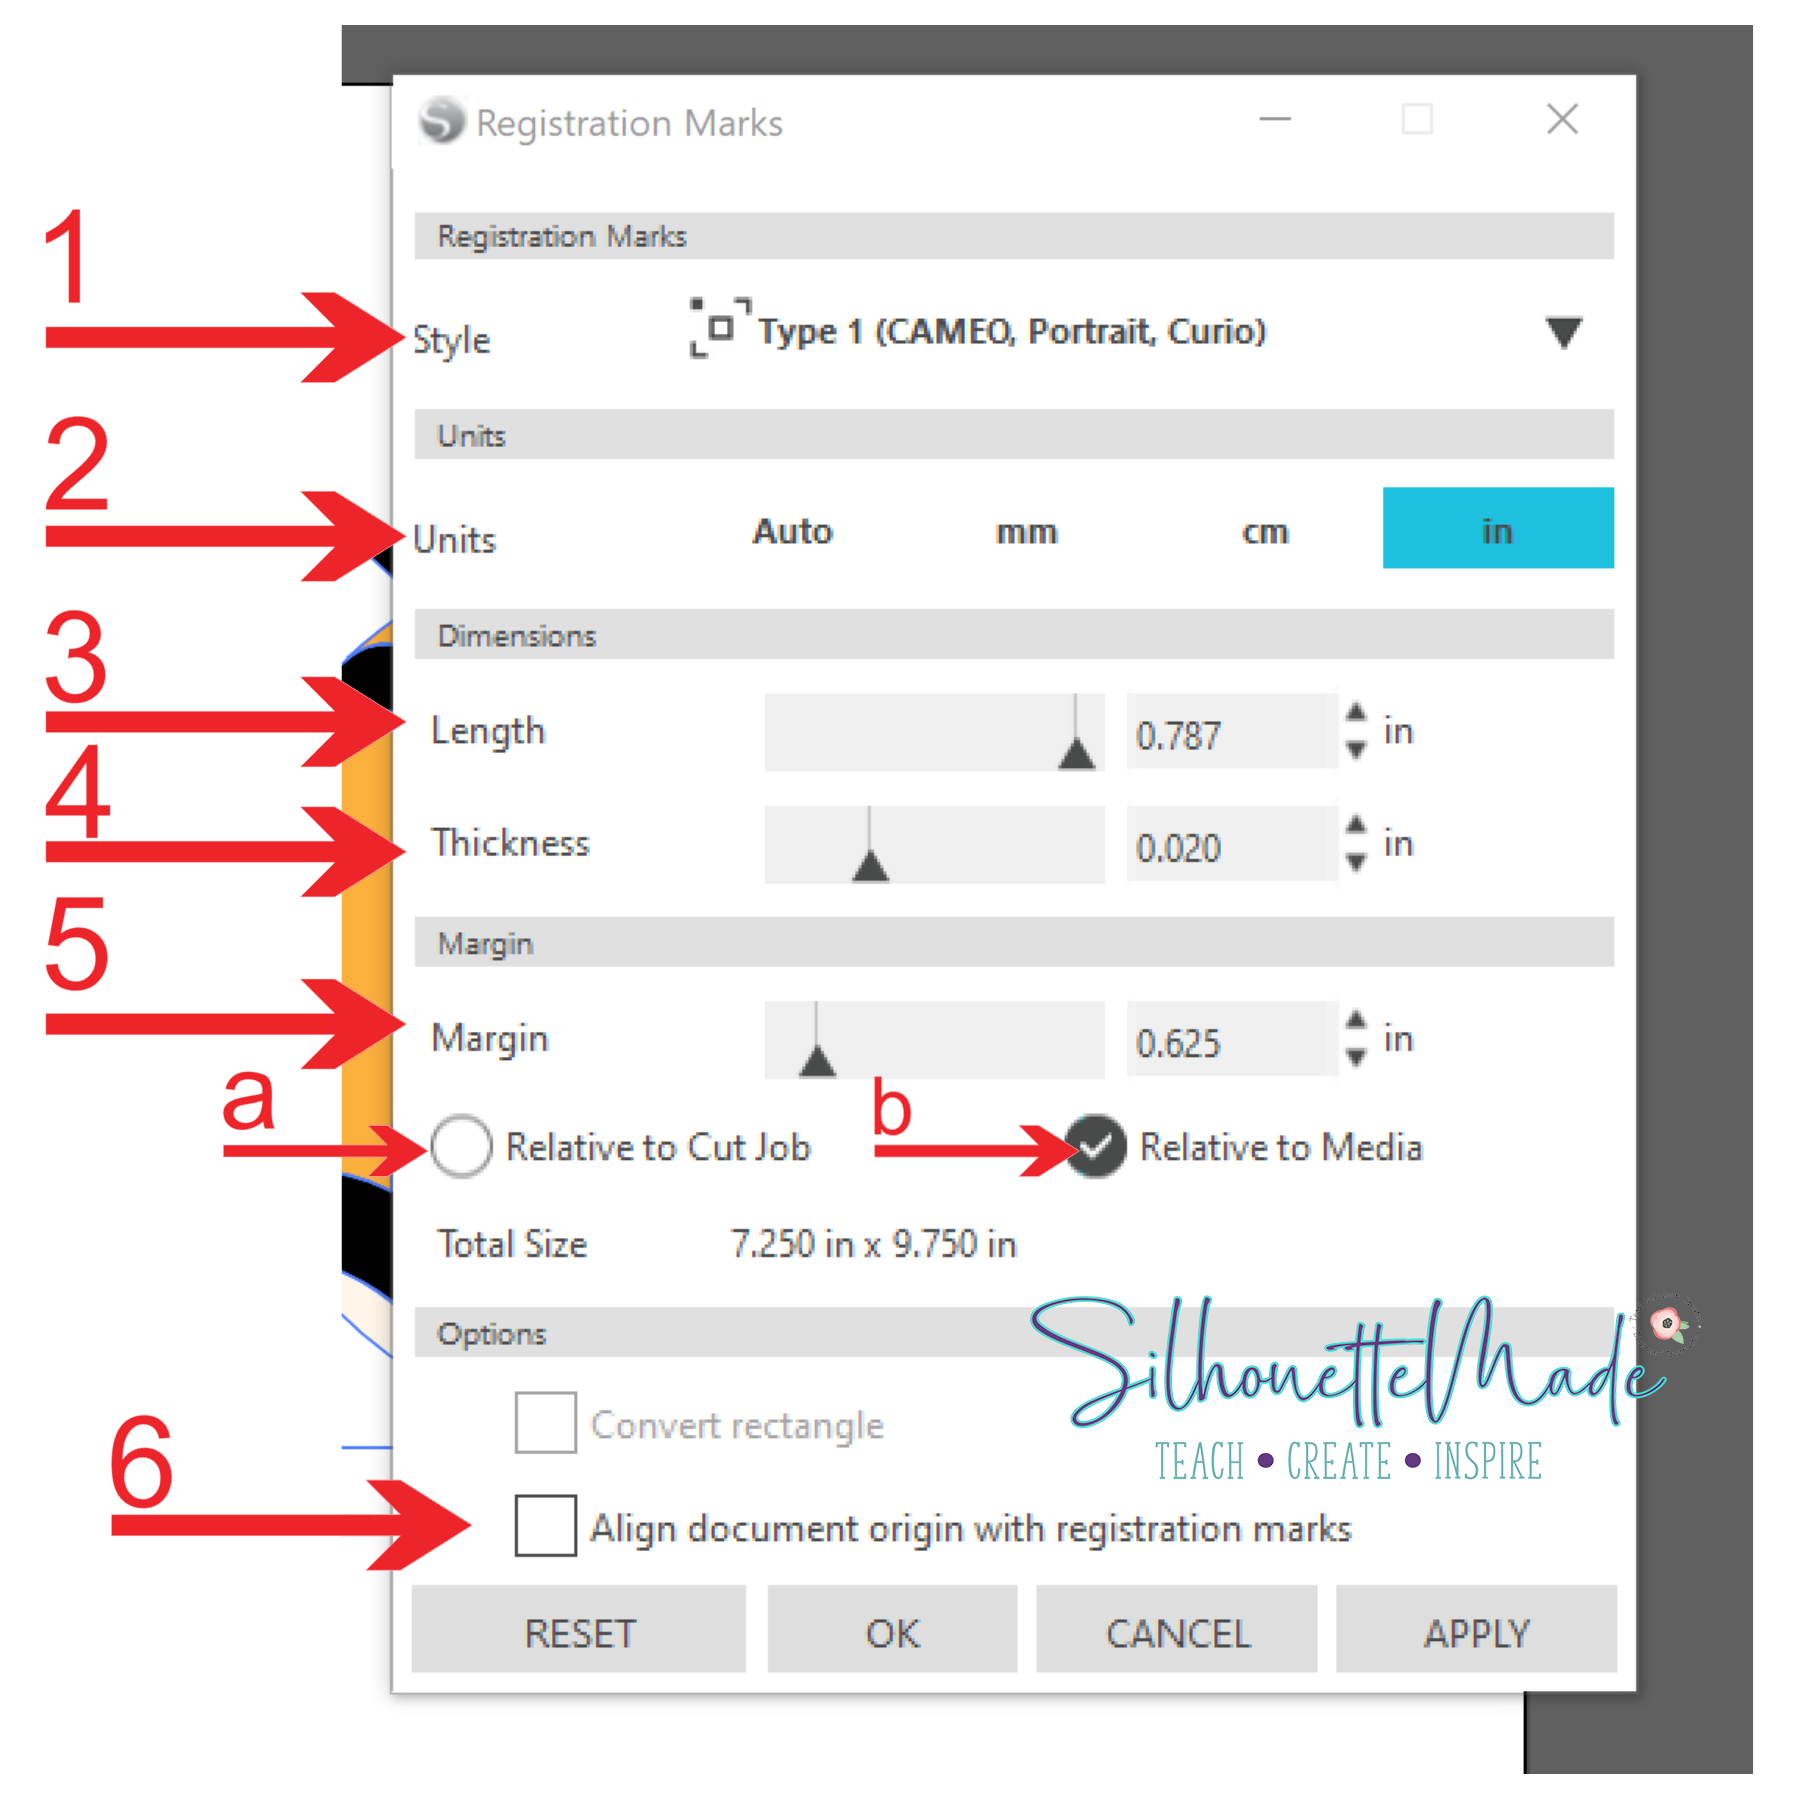
Once you have your registration marks set up in the panel, click APPLY. This will “populate” the registration marks on your Illustrator document. If you changed settings and want to go back to the default settings, just hit the RESET button.
After you apply the registration marks to your page, you can close the panel by hitting the x in the upper right corner. The document is now ready to print. Verify that everything is where you want it to be, and send it to the printer.
When it is finished printing, put the page on your mat, and load it in the machine. Once the page is loaded, go back to the document in Illustrator and go to File > Silhouette Connect > Send to Silhouette Connect.
This panel is what you will use to send your design to your machine to cut. The right side of the panel is divided into two sections, Page Setup and Send.
The left side of the panel is a design preview. The design preview does NOT show fill colors so don’t let that freak you out.
The page setup portion of the panel is very similar to the one in Silhouette Studio.
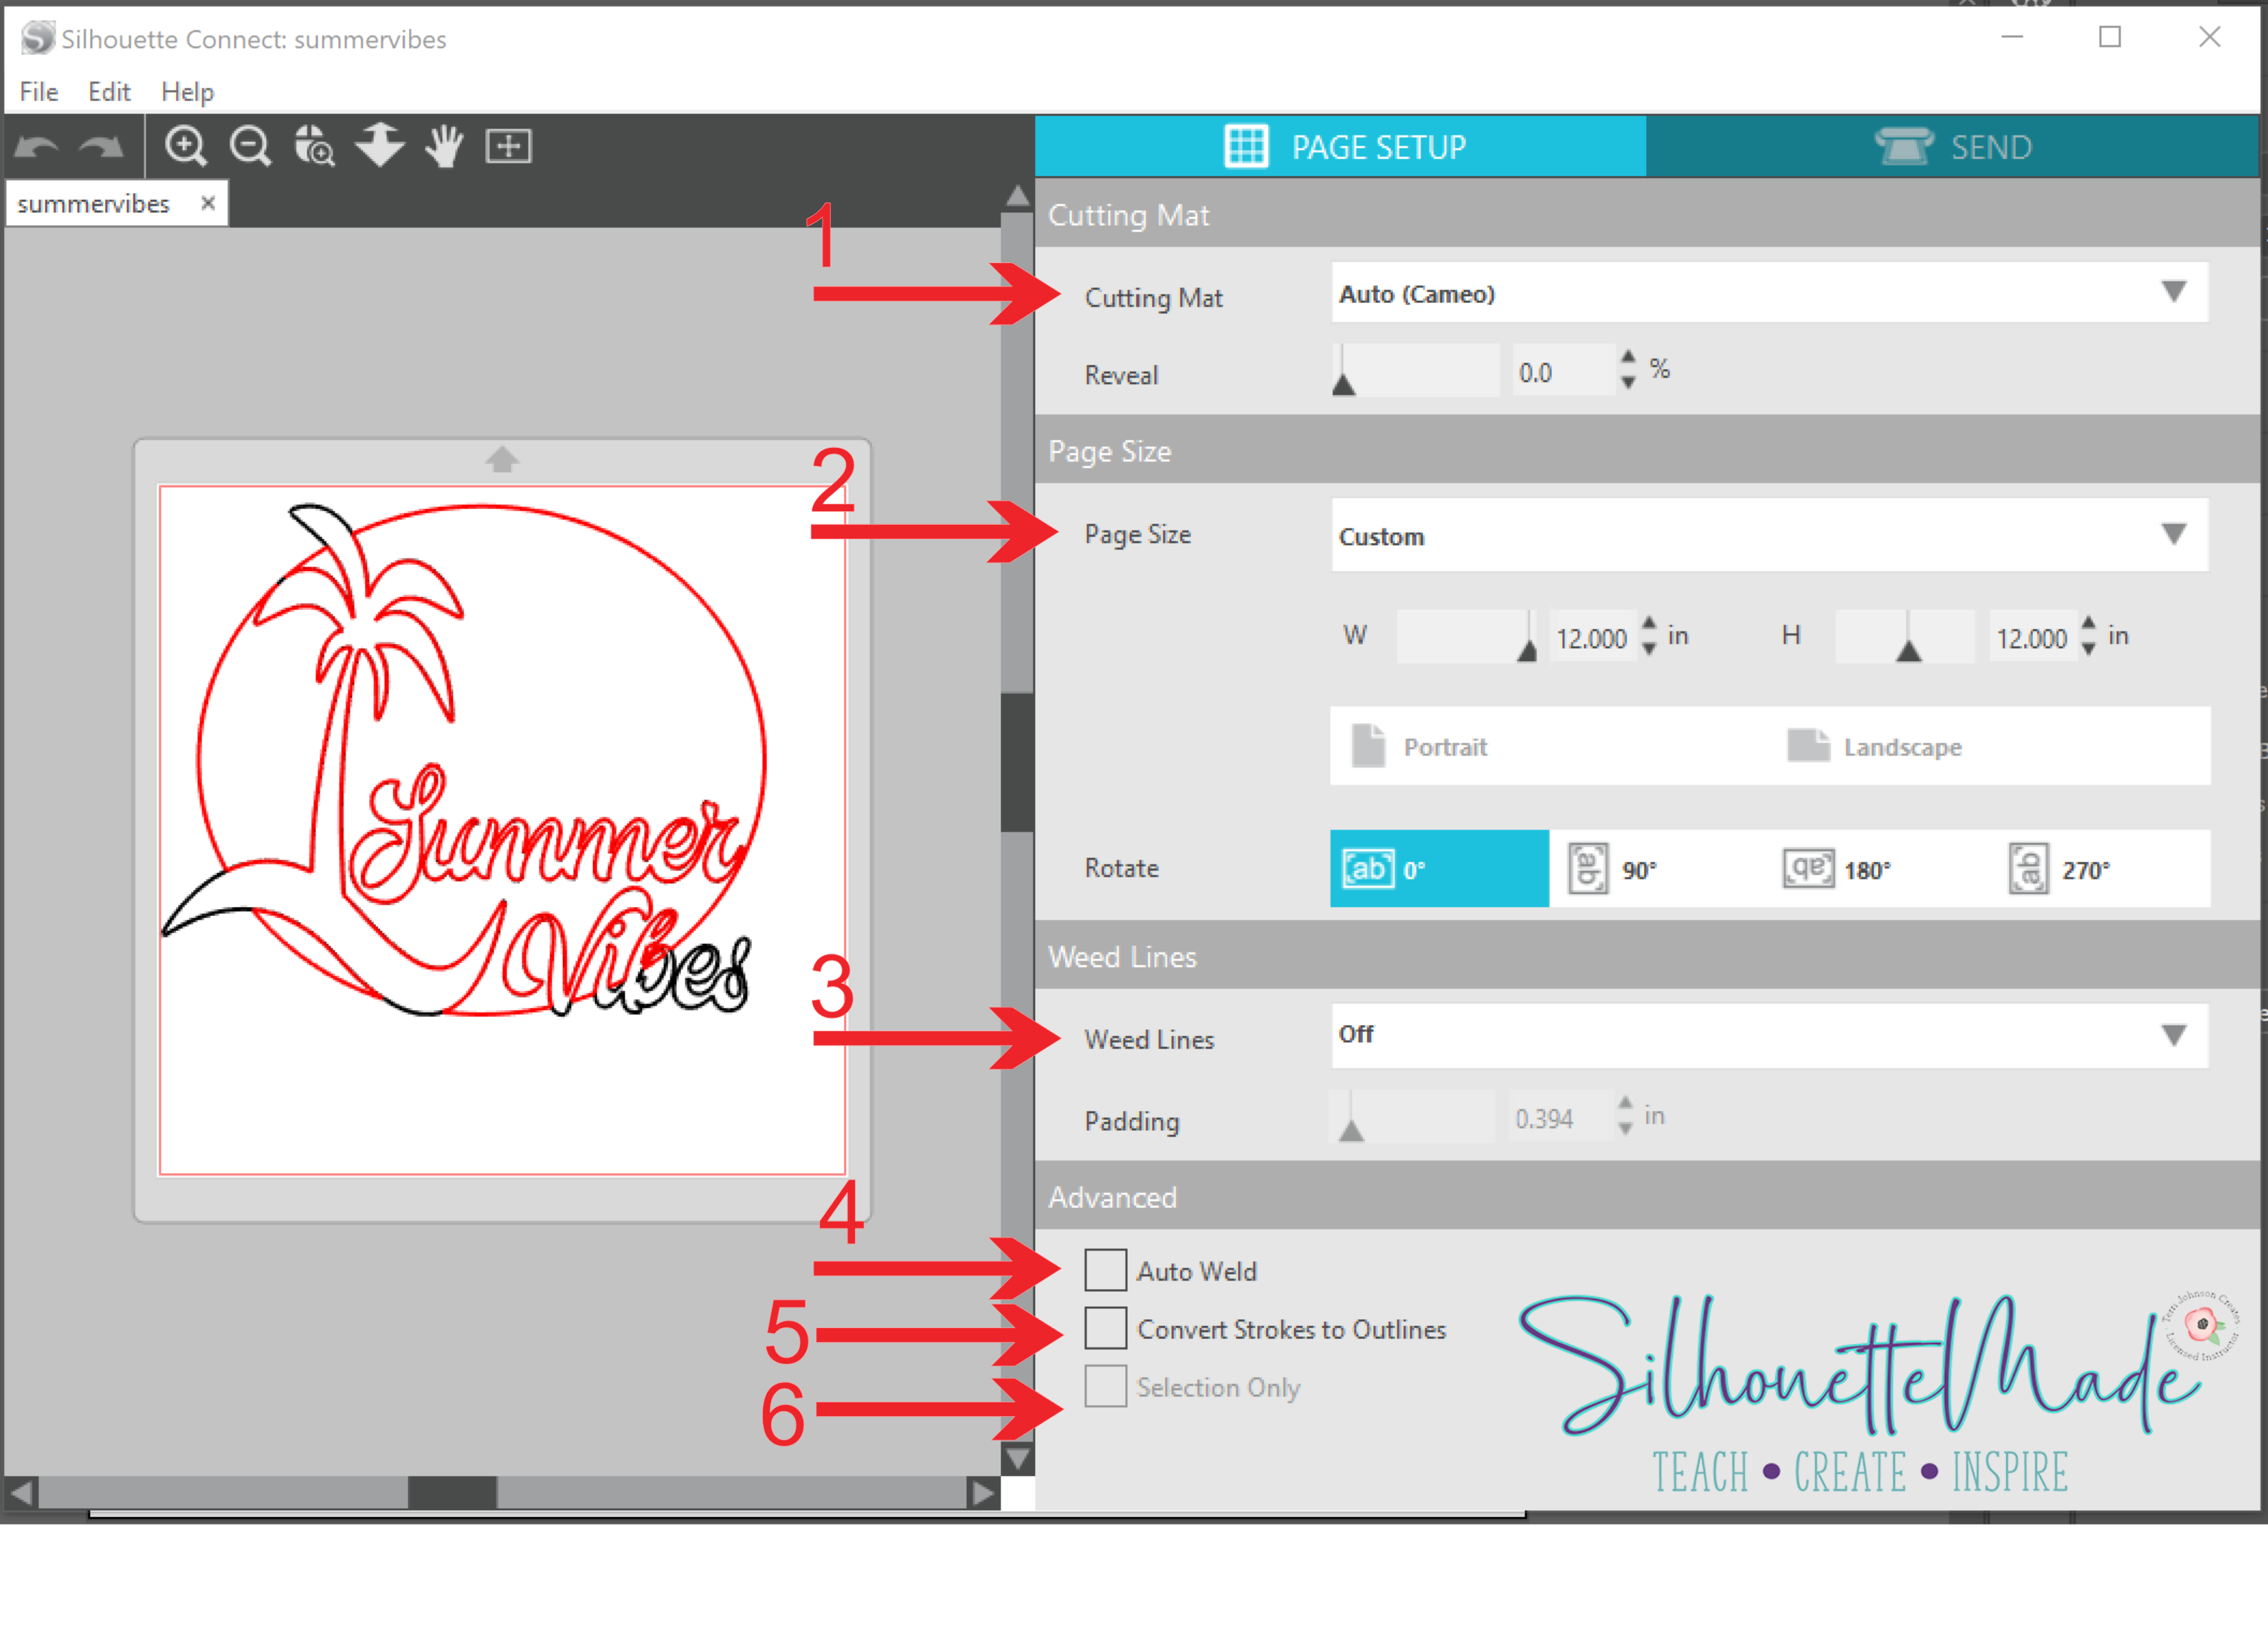
- Cutting Mat and Reveal: This is where you select what type of cutting mat you are using. You can use the reveal slider to change the transparency of the page on the mat.
- Page Size and Rotate: This is where you set your media size. The media size is the size of the material you are putting on the mat to be cut. Rotate will rotate that page in the specified direction.
- Weed Lines: This is to set up automatic weed lines. This basically puts cut lines around your design for easier weeding. There are a few different options.
- Off
- Horizonal: This adds horizontal weed lines between characters, lines of text, or objects.
- Vertical: This adds vertical weed lines between characters, lines of text, or objects.
- H / V: This adds horizontal and vertical weed lines between characters, lines of text, or objects.
- Recursive: This adds horizontal weed lines with vertical lines between each character, lines of text, or objects. The vertical lines only extend between the horizonal lines.
- Auto Weld: If you select this option, any overlapping objects or text will be automatically welded.
- Convert Strokes to Outlines: When designing in Illustrator, if you give your lines a heavy stroke, by default, Silhouette Studio will still only recognize that as a single line and will only cut down the middle of it. If you select this option, it will cut around the edge of the thick line.
- Selection Only: If you have items selected in your design and you check this box, ONLY the items you had selected when before opening Silhouette Connect will appear on the left side of the panel.
Just like the Page Setup panel, the Send Panel is very similar to the one in Silhouette Studio.
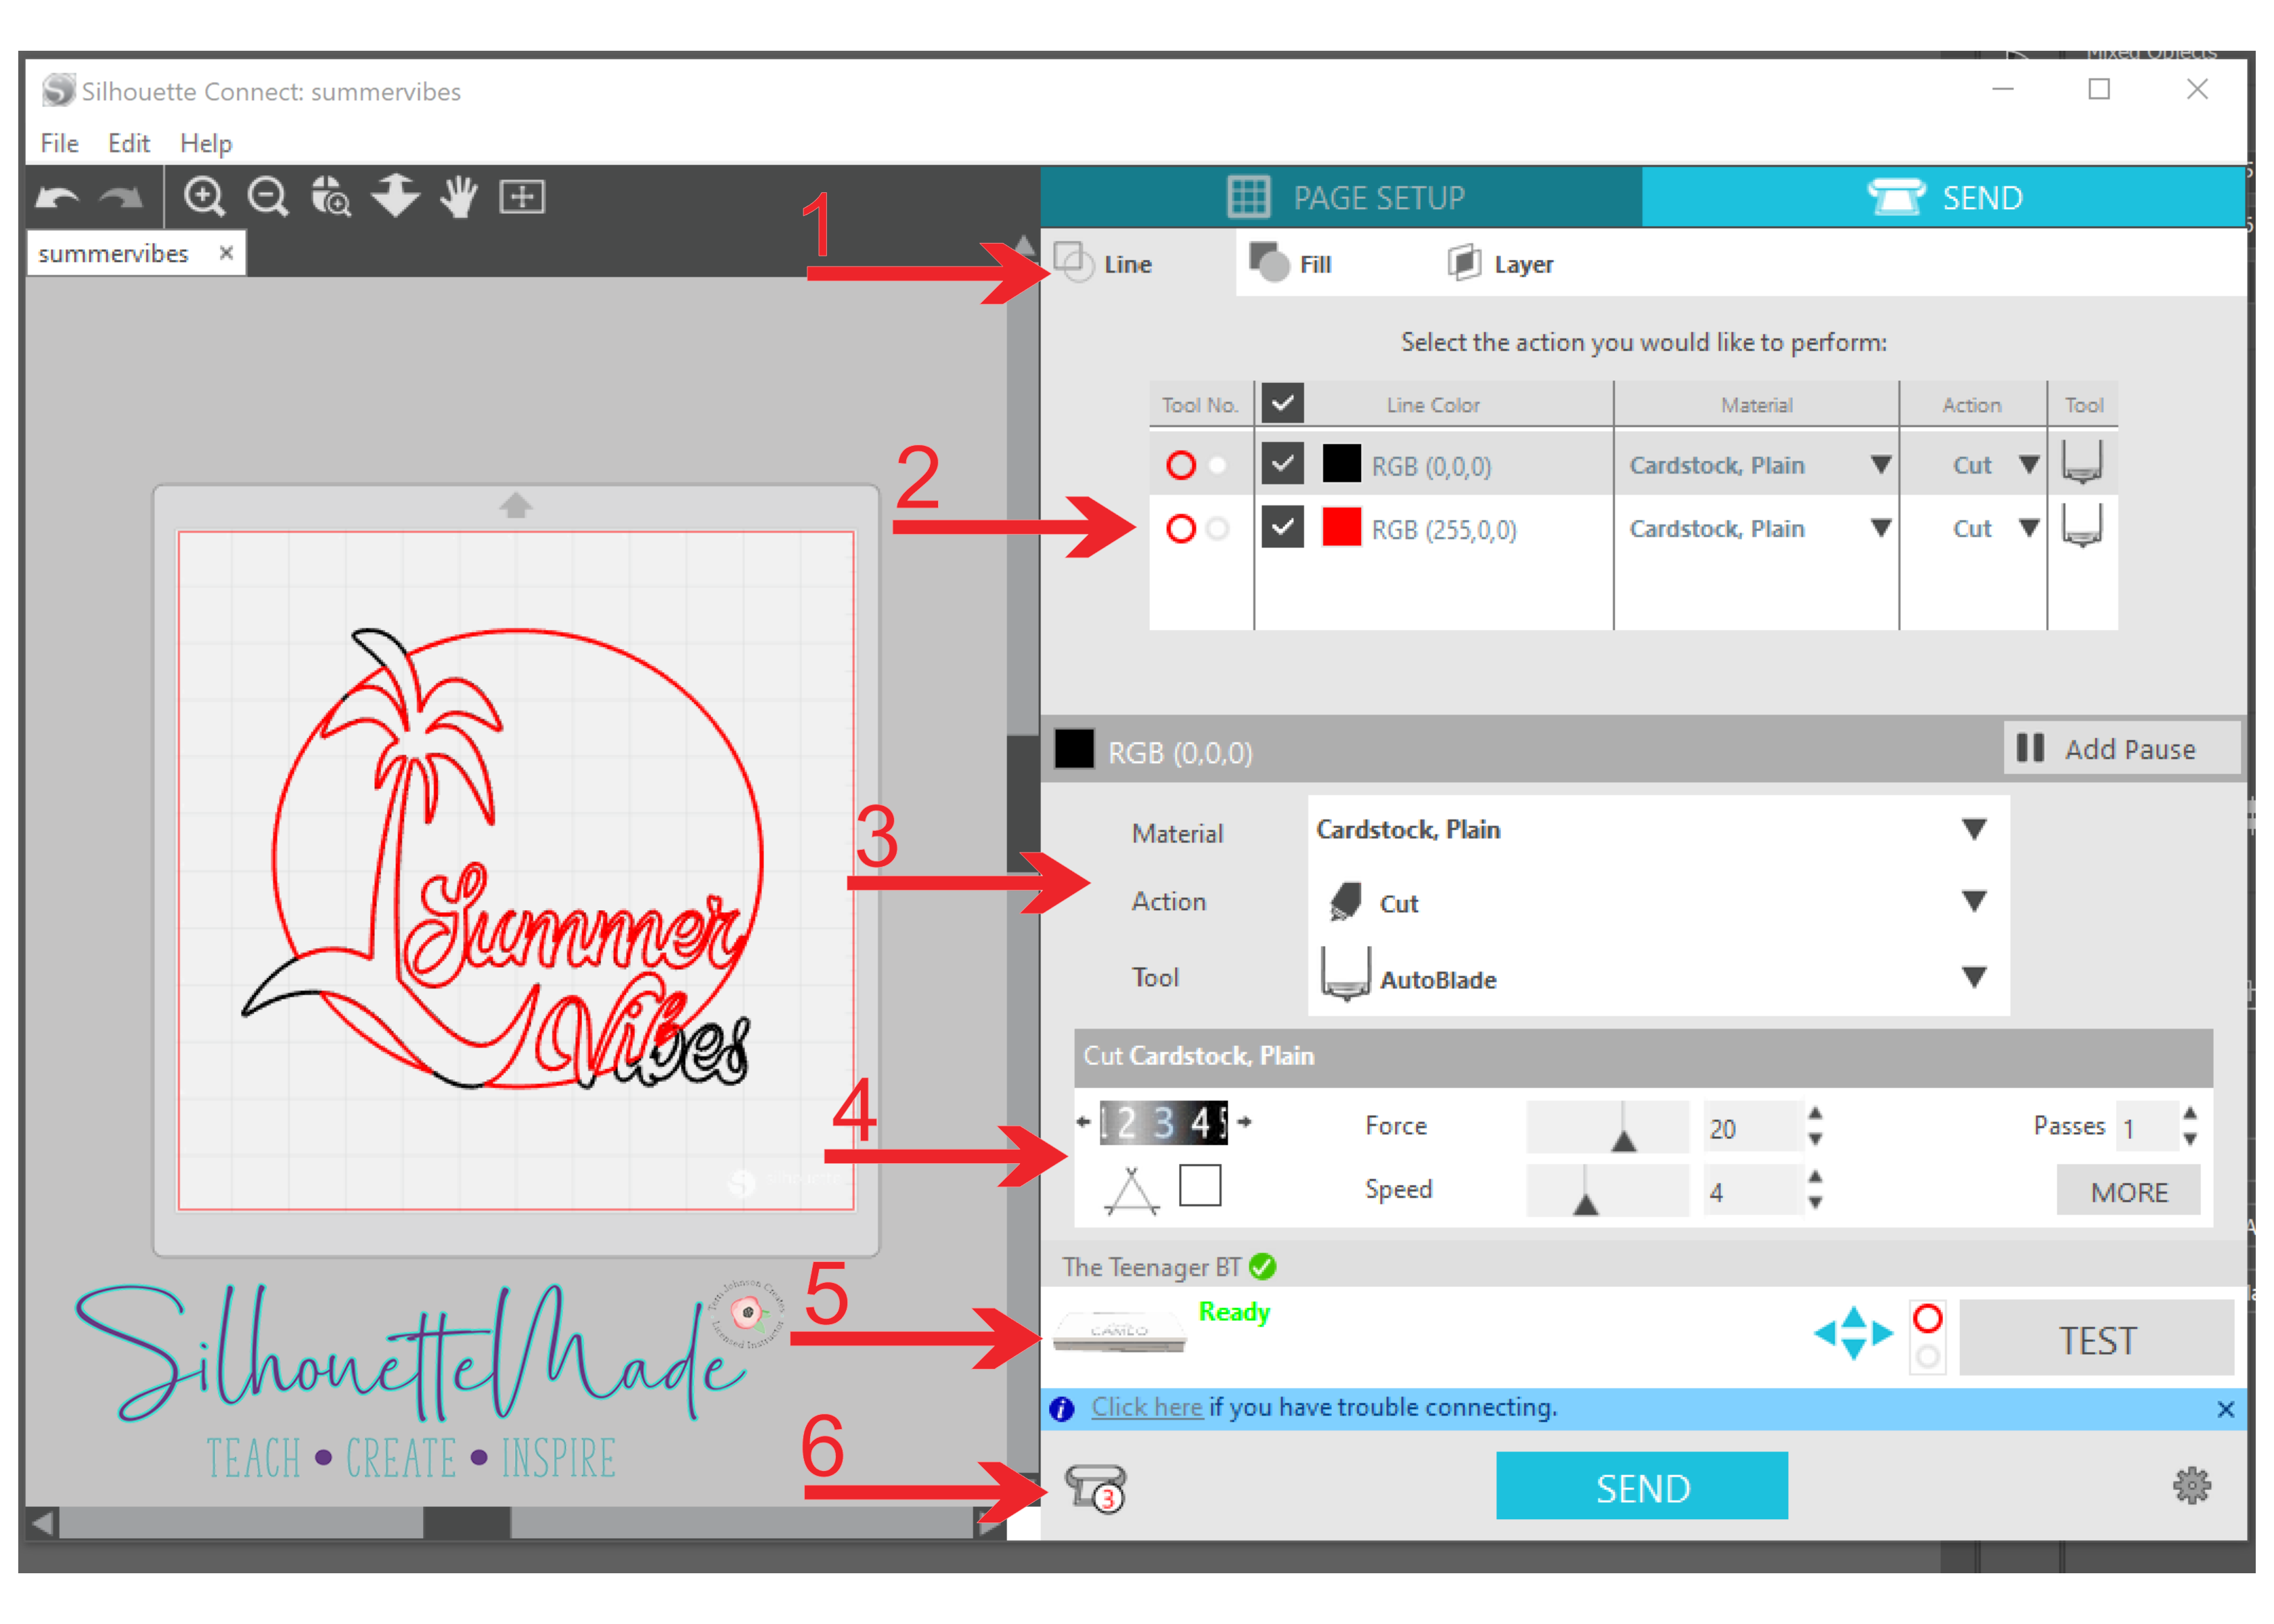
- These are the different ways to cut a file. The main difference here is that there is no Simple option like there is in Silhouette Studio. You have to cut by Line color, Fill color, or Layer.
- This is where you set which tool ( red circle is tool 1, blue circle is tool 2) is going to cut. You can turn on or off which line, fill, or layer is going to cut by checking or unchecking the box, and you can also select the material, action, and type of blade.
- This is where you setup your cut by selecting what material you are using, what action you want to preform, and what tool you are going to use.
- If you need to edit or “fine tune” your cut settings you do that in this section.
- This section shows your machine status and includes the test cut button.
- The last part of this panel allows you to select which machine you are using (if you have multiple machines or connections). It also contains the Send button and the options panel. The options panel is the same as it is in Silhouette Studio.
Once all your setting are ready to go, hit that send button and your machine will cut out your design, just like it would in Silhouette Studio.
You can also make some changes using the menu at the top of the window. Under the File menu you can switch between the Page Setup and the Send tabs and you can access the preferences window. There are basic preferences you can set in here, just like in Silhouette Studio.
Under the Edit menu, you can access the undo and redo functions and you can flip your design horizontally and vertically.
The Help menu has a link for Silhouette America. You can also view the License Agreement, Deactivate the license key, and go to the About section (this tells you want version of the plugin you are using).
I love being able to create in Illustrator and send directly to my machine without having to save the file to my computer and opening it in Silhouette Studio. When I do use Illustrator, this makes the process so much smoother.
I would love to see your projects. You can post photos or ask questions on my Facebook page or group:
www.facebook.com/SilhouetteMade
www.facebook.com/groups/SilhouetteMadewithSarah
To share or save this post please pin the image below.


Ai files are specific to Adobe illustrator. You would need to save as a different file type from Adobe….if you have designer edition or higher save as svg….if you have business edition you can save as eps from Illustrator and open that. But the most common is svg